Okay! Here is where I attempt to show you the coolest.thing.ever that I learned from Jennifer "JP" Pett-Ridge during my colorwork class at my LYS Article Pract. The heavy pics are a necessity, and if you want to "get it" I'd suggest starting up a swatch and following along (I know as I look at these pics, they don't make sense... but as you go with needles and yarn in your hand, its a revelation fo sho.) These instructions are written for an English/right hand knitter, since I'm biased that way ;) (Seriously though, I don't know how to knit Continental so I can't show how to do it left handed.)
(edit, 10/07: Jen in KS has unvented the continental answer for those of pickers who want to weave in ends while knitting continental! go jen!! :))
Also, please excuse my colorful hands... I fought the dye and the dye won. (Pics later, too many today!) :)
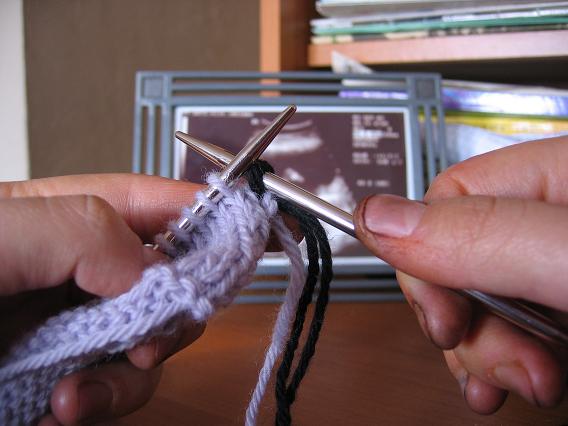
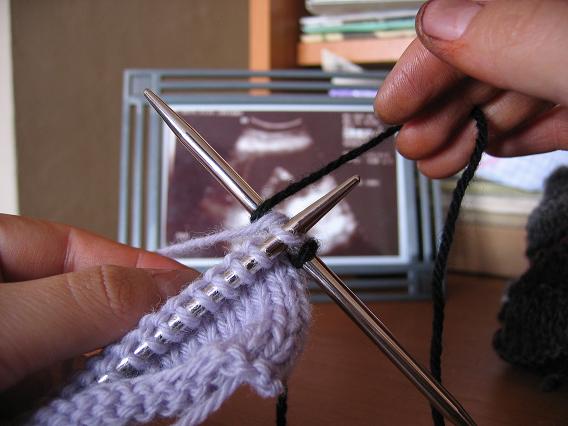
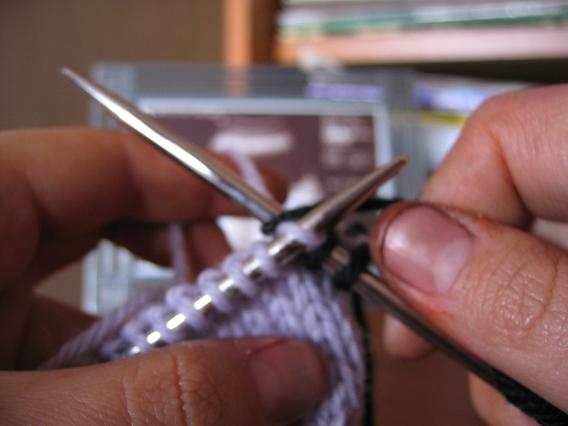
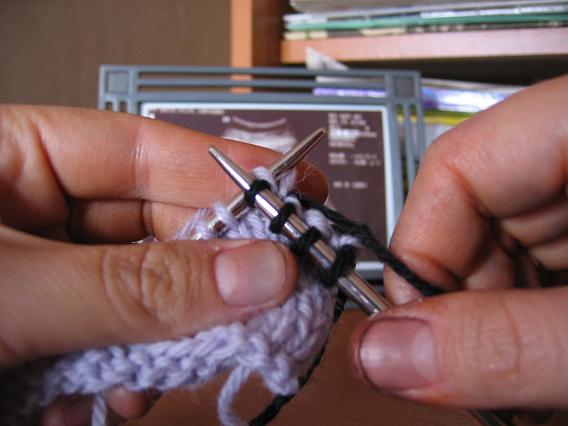
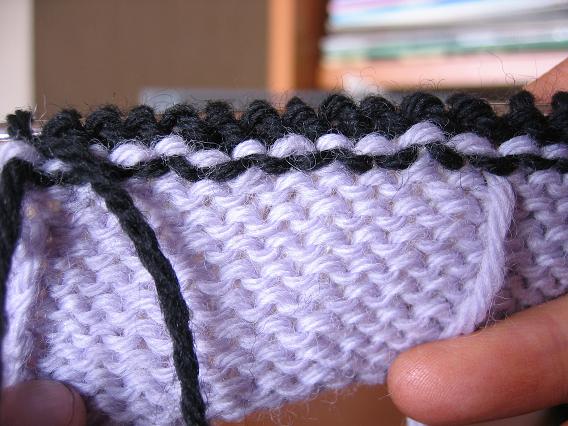
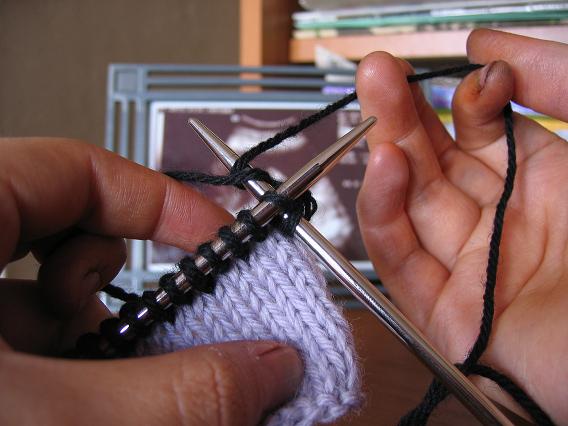
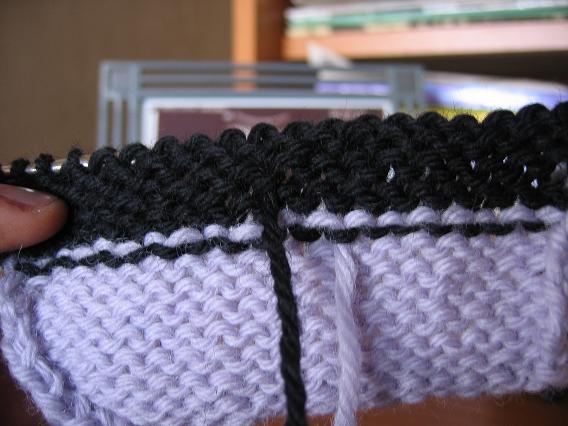
First, begin with a new color. Knit the first stitch with your new color (black) as you would normally. Hold the end of the old color (purple) in your left hand, and hold your working/new color in your right as normal. You will not let go of the end yarn in order to keep it taut/tensioned-- it may feel awkward at first, but you don't want to drop and pick up the yarn. (I'm not holding the end/purple yarn in my hand in this pic, my timer went off too soon :))
While holding the yarn as described above, insert your working needle into the 2nd stitch on the needle as if to knit it normally.
Take the end of the old color (purple) and lay it across the top of your working needle (counterclockwise fashion, the OPPOSITE of how you would wrap your working yarn to make a stitch.) You're just laying it on top of the needle and holding it there w/ your left hand.
Another view of laying the end yarn over the working needle. Notice its just draped across.
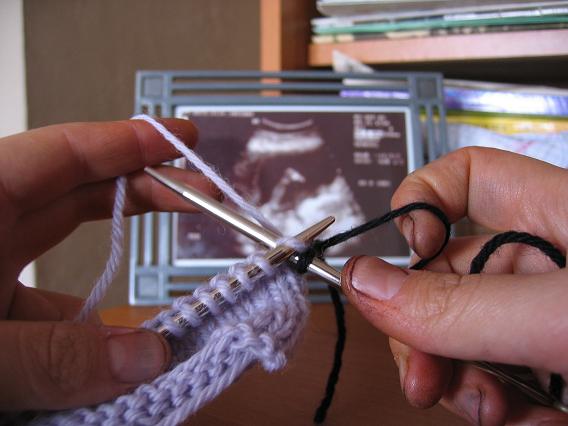
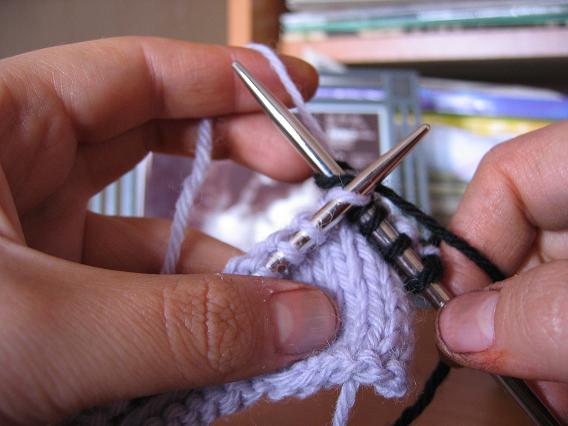
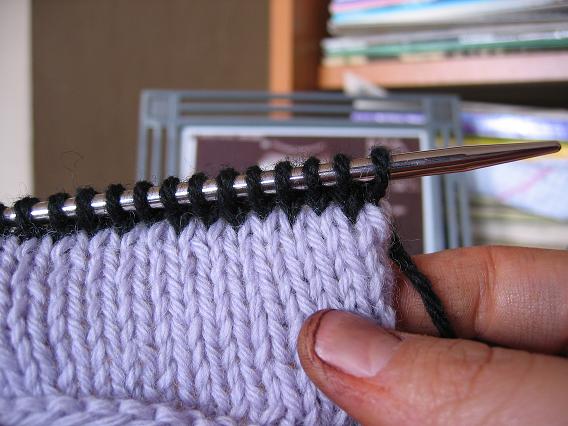
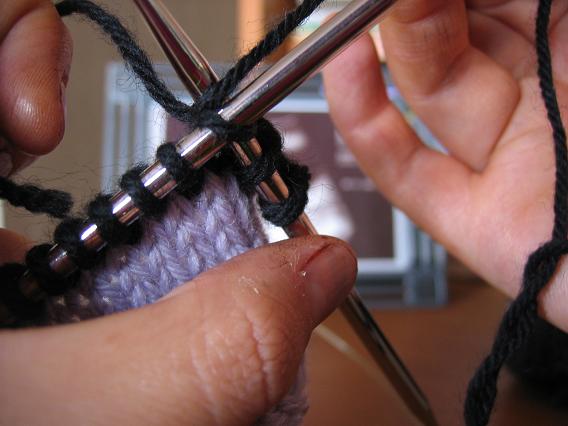
Now, while holding the end yarn in place as described above, knit a stitch with your new color (black). Note that the knit stitch is wrapped the OPPOSITE way that the end yarn is wrapped.
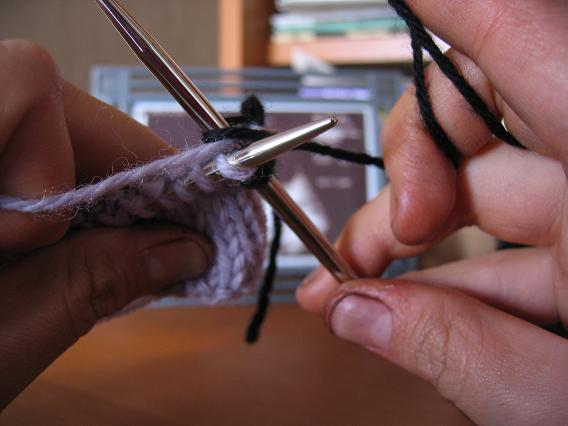
Another view of knitting the 2nd stitch on the needle with the end yarn draped over the working needle.
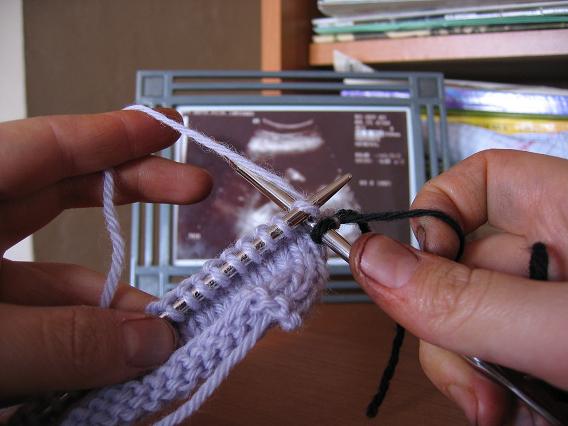
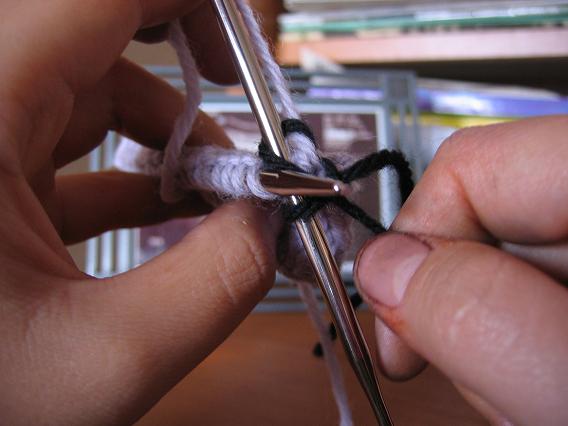
Pull the working yarn (black) thru as knitting a stitch normally. Note that the stitch is not only being knit, but the working yarn is "catching" the end yarn and going under it to create the stitch. Only the working (black) yarn will be pulled thru and made into a stitch.
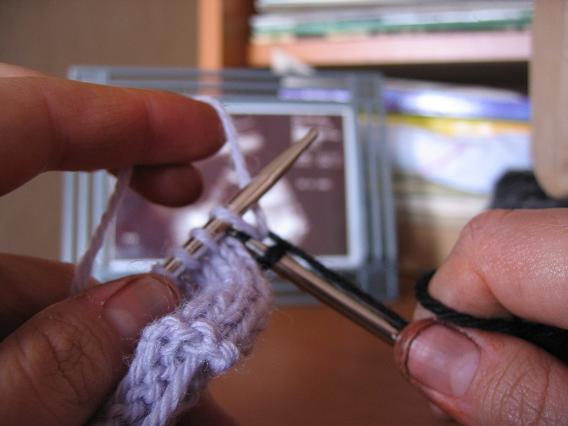
This is what the 2nd stitch on the needle looks like, as the end yarn is woven in behind.
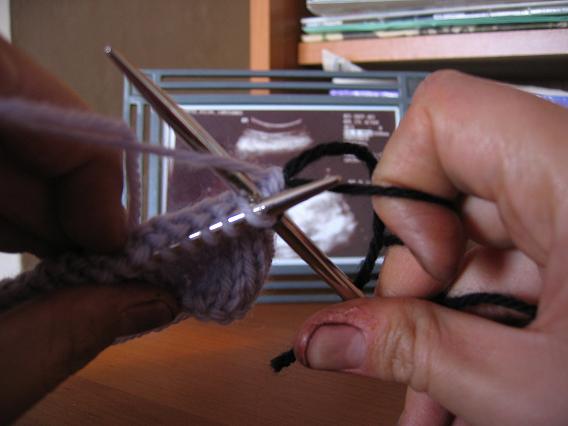
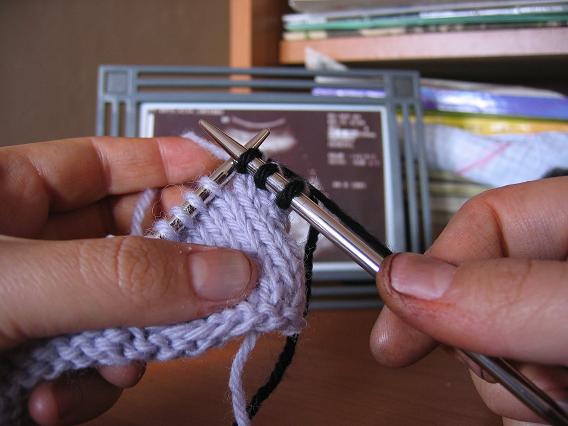
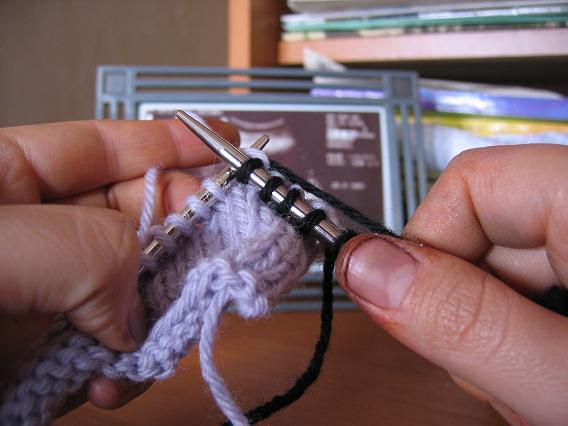
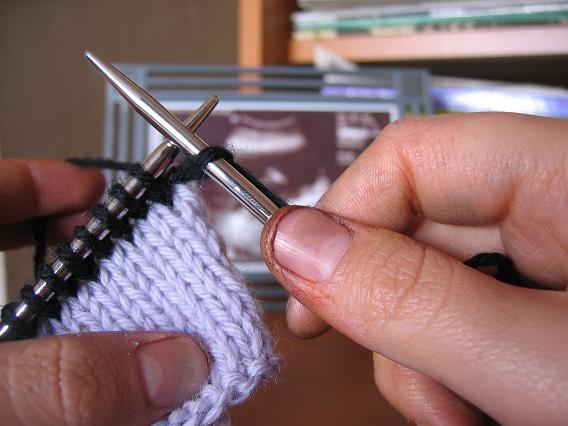
While still holding the end yarn in the left hand, knit a stitch with the working yarn normally. (You don't have to do anything "special" on this step except for retaining the end yarn in your left hand.) The working (black) yarn will go over the end yarn to "hold" it down and make it point downwards.
(Second view.) How the 3rd stitch on the needle looks, as the stitch is worked normally as described above.
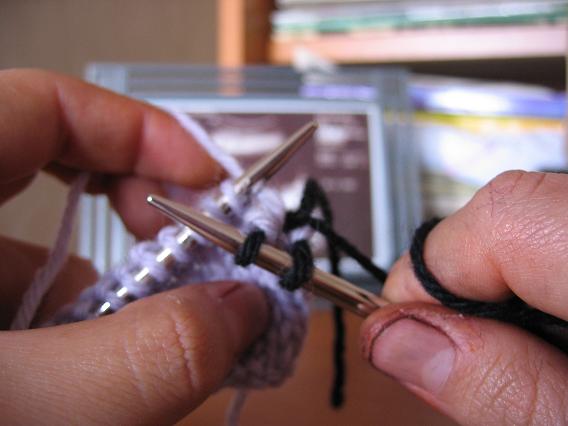
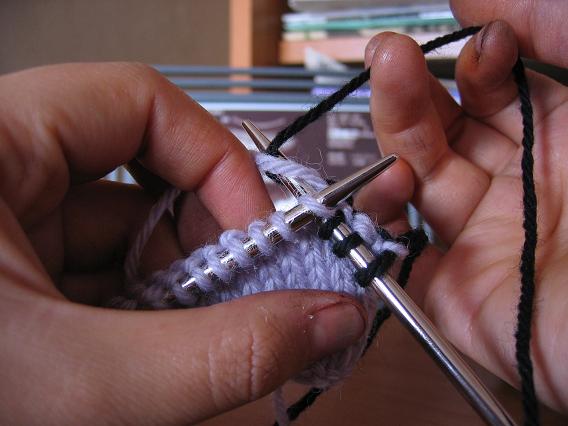
What 3 stitches look like with the end woven behind the latter 2 stitches.
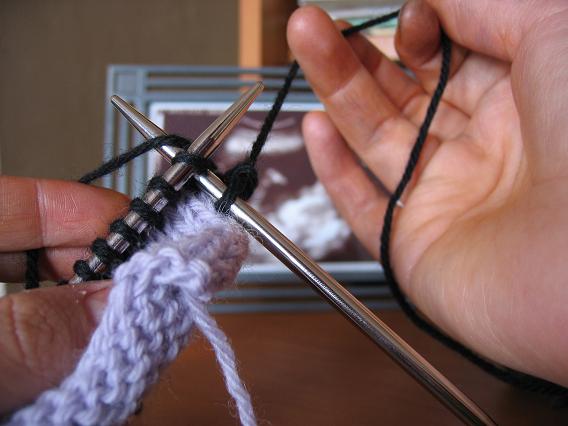
Now, that's it. :) What I mean is, all you have to do is lay the end yarn over the working needle and knit, and then not lay the end yarn over the working needle and knit. Weaving in ends is just that 2-step process-- weaving in the end yarn and locking it down. Only the first stitch is knit normally, until you have enough of the end woven in as you prefer. (an inch? two? six stitches? twelve? up to you.)
The following pics are a repeat of the process above as I work across the row.
Again, lay the end yarn over the working needle in a counterclockwise direction, and knit the stitch with the working yarn as normal.
The end is woven in as the working yarn makes its stitch.
The working yarn makes a stitch as normal, and in the process "locks down" the end yarn that's being held in the left hand (but isn't being draped across the needle now).
2nd locking stitch complete.
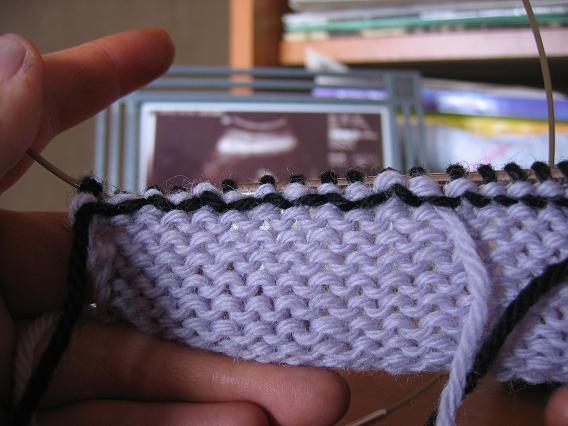
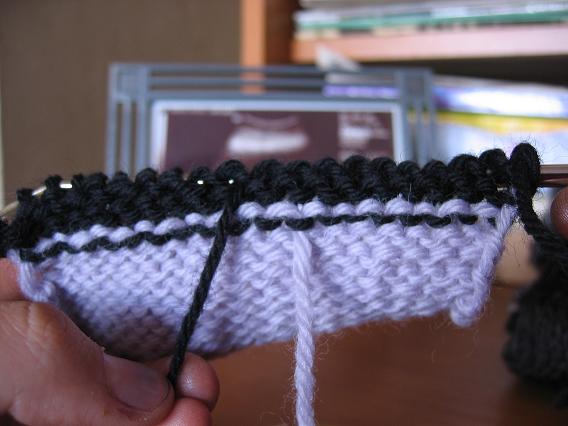
Here I've woven in the end of the yarn over 10 stitches + 1 (5 pairs of weaving & locking, plus the original 1st knit stitch). After the end is woven in to your desired length (and after a pair of weaving/locking stitches), you just drop the end and knit across as normal. This pic is of the WS after knitting/weaving across one row.
If you look *super* close, you may be able to see where the end yarn (purple) is doubled-- every other "purl" bump on the WS will have a "double" bump where the end yarn has been locked down after being woven in. Its easiest to see this where the purple end is hanging-- the bump above is a doubled bump with the end woven in, and every other stitch preceding it also is doubled.
Purl back as normal. All of the weaving happens on the wrong side (WS), so you have to have the right side (RS) facing you as you weave in your ends so that they end up on the WS. No work happens on the purl back/WS row.
Here you repeat the weaving steps, this time with the end of the new yarn (the black end that was left from when you added the new color).
New RS with new color. Note you can't see the purple end woven in thru the RS (and its pretty tough to see it on the WS, too!) :)
Knit 1st stitch on needle.
Holding end of yarn in left hand, lay it over the working needle in a counterclockwise dx.
Knit stitch with end yarn draped over (sliding the working yarn under and catching the end yarn).
Knit 2nd "locking" stitch as normal.
Proceed across row, alternating weaving & locking til end is woven in to your satisfaction. As above, drop end and knit across as normal. (WS after knitting across row & weaving in the end yarn.) Near to impossible to see the black yarn end woven in, but its there.
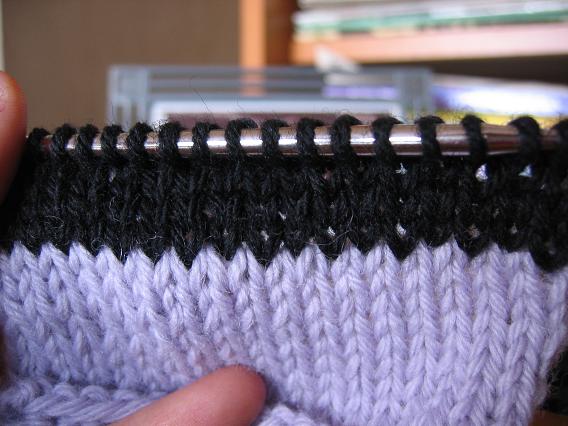
This is the RS after a few normal (non-locking/weaving) rows have been knit. Note that you can't see the purple yarn thru the RS where it has been woven in.
This is the WS after a few normal (non-locking/weaving rows). Again, you can't see the woven in ends, but you can tell where they are from where the ends hang. You can trim these to your heart's desire too.
****
I am super grateful to JP for allowing me to share this technique I learned from her. It has made a huge difference to me (and will in the future too!)... but my immediate gratification came from the Lizard Ridge project. I had been carrying up the working/alternating yarns up the side of the afghan as directed in the pattern. If I didn't, I would have to have 96 ends to weave in for each panel (not including the ends when starting a new ball, or the cast on/bind off rows-- there are 48 short rows to work and 2 ends each to weave in.) It would be mind numbing to weave in 384 ends over 4 panels, so I just carried the yarn up the side...
1st Lizard Ridge panel with stranded yarn up the side
I didn't care for the look, and was terrified of finishing the afghan with all of these strands to contend with (and, one end of the afghan may have strands off of the side edge!). Again though, there's no way I was going to weave in those ends after... but this new weaving in ends as you knit is just the best.thing.ever...
Nice, neat edge with ends woven in as I knit. Not sure how close I'll trim those ends once done.
It may feel awkward at first to do, but you really get a hang of it and it doesn't take that long (and doesn't make me recoil like a darning needle does). I can see this technique opening up worlds to me-- I won't be afraid of stripes anymore, and as I am letting my fear of colorwork go, it will make the process more enjoyable as I won't dread the finishing.
Good luck! Thanks again to JP for teaching me this AND allowing me to share it with yall... she teaches various knitting classes across the bay area-- jump at the chance to learn something from her! :)
(edit, 10/07: Jen in KS has unvented the continental answer for those of pickers who want to weave in ends while knitting continental! go jen!! :))
Also, please excuse my colorful hands... I fought the dye and the dye won. (Pics later, too many today!) :)
First, begin with a new color. Knit the first stitch with your new color (black) as you would normally. Hold the end of the old color (purple) in your left hand, and hold your working/new color in your right as normal. You will not let go of the end yarn in order to keep it taut/tensioned-- it may feel awkward at first, but you don't want to drop and pick up the yarn. (I'm not holding the end/purple yarn in my hand in this pic, my timer went off too soon :))
While holding the yarn as described above, insert your working needle into the 2nd stitch on the needle as if to knit it normally.
Take the end of the old color (purple) and lay it across the top of your working needle (counterclockwise fashion, the OPPOSITE of how you would wrap your working yarn to make a stitch.) You're just laying it on top of the needle and holding it there w/ your left hand.
Another view of laying the end yarn over the working needle. Notice its just draped across.
Now, while holding the end yarn in place as described above, knit a stitch with your new color (black). Note that the knit stitch is wrapped the OPPOSITE way that the end yarn is wrapped.
Another view of knitting the 2nd stitch on the needle with the end yarn draped over the working needle.
Pull the working yarn (black) thru as knitting a stitch normally. Note that the stitch is not only being knit, but the working yarn is "catching" the end yarn and going under it to create the stitch. Only the working (black) yarn will be pulled thru and made into a stitch.
This is what the 2nd stitch on the needle looks like, as the end yarn is woven in behind.
While still holding the end yarn in the left hand, knit a stitch with the working yarn normally. (You don't have to do anything "special" on this step except for retaining the end yarn in your left hand.) The working (black) yarn will go over the end yarn to "hold" it down and make it point downwards.
(Second view.) How the 3rd stitch on the needle looks, as the stitch is worked normally as described above.
What 3 stitches look like with the end woven behind the latter 2 stitches.
Now, that's it. :) What I mean is, all you have to do is lay the end yarn over the working needle and knit, and then not lay the end yarn over the working needle and knit. Weaving in ends is just that 2-step process-- weaving in the end yarn and locking it down. Only the first stitch is knit normally, until you have enough of the end woven in as you prefer. (an inch? two? six stitches? twelve? up to you.)
The following pics are a repeat of the process above as I work across the row.
Again, lay the end yarn over the working needle in a counterclockwise direction, and knit the stitch with the working yarn as normal.
The end is woven in as the working yarn makes its stitch.
The working yarn makes a stitch as normal, and in the process "locks down" the end yarn that's being held in the left hand (but isn't being draped across the needle now).
2nd locking stitch complete.
Here I've woven in the end of the yarn over 10 stitches + 1 (5 pairs of weaving & locking, plus the original 1st knit stitch). After the end is woven in to your desired length (and after a pair of weaving/locking stitches), you just drop the end and knit across as normal. This pic is of the WS after knitting/weaving across one row.
If you look *super* close, you may be able to see where the end yarn (purple) is doubled-- every other "purl" bump on the WS will have a "double" bump where the end yarn has been locked down after being woven in. Its easiest to see this where the purple end is hanging-- the bump above is a doubled bump with the end woven in, and every other stitch preceding it also is doubled.
Purl back as normal. All of the weaving happens on the wrong side (WS), so you have to have the right side (RS) facing you as you weave in your ends so that they end up on the WS. No work happens on the purl back/WS row.
Here you repeat the weaving steps, this time with the end of the new yarn (the black end that was left from when you added the new color).
New RS with new color. Note you can't see the purple end woven in thru the RS (and its pretty tough to see it on the WS, too!) :)
Knit 1st stitch on needle.
Holding end of yarn in left hand, lay it over the working needle in a counterclockwise dx.
Knit stitch with end yarn draped over (sliding the working yarn under and catching the end yarn).
Knit 2nd "locking" stitch as normal.
Proceed across row, alternating weaving & locking til end is woven in to your satisfaction. As above, drop end and knit across as normal. (WS after knitting across row & weaving in the end yarn.) Near to impossible to see the black yarn end woven in, but its there.
This is the RS after a few normal (non-locking/weaving) rows have been knit. Note that you can't see the purple yarn thru the RS where it has been woven in.
This is the WS after a few normal (non-locking/weaving rows). Again, you can't see the woven in ends, but you can tell where they are from where the ends hang. You can trim these to your heart's desire too.
****
I am super grateful to JP for allowing me to share this technique I learned from her. It has made a huge difference to me (and will in the future too!)... but my immediate gratification came from the Lizard Ridge project. I had been carrying up the working/alternating yarns up the side of the afghan as directed in the pattern. If I didn't, I would have to have 96 ends to weave in for each panel (not including the ends when starting a new ball, or the cast on/bind off rows-- there are 48 short rows to work and 2 ends each to weave in.) It would be mind numbing to weave in 384 ends over 4 panels, so I just carried the yarn up the side...
1st Lizard Ridge panel with stranded yarn up the side
I didn't care for the look, and was terrified of finishing the afghan with all of these strands to contend with (and, one end of the afghan may have strands off of the side edge!). Again though, there's no way I was going to weave in those ends after... but this new weaving in ends as you knit is just the best.thing.ever...
Nice, neat edge with ends woven in as I knit. Not sure how close I'll trim those ends once done.
It may feel awkward at first to do, but you really get a hang of it and it doesn't take that long (and doesn't make me recoil like a darning needle does). I can see this technique opening up worlds to me-- I won't be afraid of stripes anymore, and as I am letting my fear of colorwork go, it will make the process more enjoyable as I won't dread the finishing.
Good luck! Thanks again to JP for teaching me this AND allowing me to share it with yall... she teaches various knitting classes across the bay area-- jump at the chance to learn something from her! :)
| Etsy: Your place to buy & sell all things handmade zero.etsy.com |
Many thanks for these instructions -- this is awesome! I sooooo need pictures to look at when I try something new in the knitting world! If I do decide to make the colorwork sweaters for the boys this will definitely be a must!
ReplyDeleteThis is awesome! Thanks for telling us about this!
ReplyDeletethat makes SOOOOO much sense, even without needles in hand. I could jsut hug you right now.
ReplyDeleteGreat technique. I'll use it on my blanket, the next time I need to change a color
ReplyDeleteSuper useful, thanks for the tutorial! I'm definitely going to try this one out...
ReplyDeleteThanks for the great tutorial. It's just in time for me to change colors on a sock I'm knitting. I hate, hate, hate weaving in ends so, fr me, this is huge!
ReplyDeleteoooh! very cool! I'm so going to have to try this... I can't wait to see lizard ridge all done! seems like you're knitting awfully fast on it. :)
ReplyDeleteIf I understand the instruction correctly, I think I did something similar when I did my first stranded knitting, to lock down the floats in the back when I had to carry them several stitches along. I never thought to try it with my ends. Thanks!
ReplyDeleteIt looks like you're knitting continental with the end in these pics.
I think you just blew my mind.
ReplyDeleteThis is SO. AWESOME.
Thankyouthankyouthankyou!
I have tried to learn this method before, but I am going to do it again with your tutorial. I am going to try something new with my woven in ends. I am thinking that I will give each end a couple of pokes with a felting needle to make the end stay in place.
ReplyDeleteVery nice tutorial. I hate ends, and I love working them in as I go.
ReplyDeleteThanks for the cool tutorial! I HATE weaving in ends, so I'm definately gonna try this!
ReplyDeleteThanks for the tutorial, Aija!
ReplyDeleteI was dyeing last night, and my hands look the same!
absolutely! I have been doing this for years, I first learnt it in a Kaffe Fasset book, and never looked back!!
ReplyDelete:-)
Thank you so much for this tutorial. I saw this method demostrated in other blogs, but none so thoroughly photographed or explained as well as you.
ReplyDeleteI am a very visual learner and can't translate dense text without images, so I appreciate this! It will immediately go into practice. I love reading your blog, please never stop.
Very cool technique -- thanks for the great tutorial!
ReplyDeleteOMG! Thanks to both you and JP. I've been sort of doing that, but knitting both strands for 4 or 5 stitches.
ReplyDeleteCame to a knot in a skein of yarn yesterday and of course it landed right on front. Need to RIP as the thicker yarn made a big-ass bump. I was pulling the layed over stitch through and knitting both.
I've never been sure how to weave the ends in...I think I tend to over-do it!
Thanks for posting this - great instructions. I can't wait to try this...I hate weaving in ends!
ReplyDeleteGirl, I am SO GLAD you put up these pictures. I've tried this before with written instructions but seeing this pictures it finally clicked! You're the best!
ReplyDeleteYou (and JP) absolutely rock! Thank you so much for that little tutorial. I will go for weeks without weaving in ends because I can't stand to do it, so I will definitely work this in to my next multi-color project :)
ReplyDeleteThank you!!!!! Makes perfect sense! I printed it out so I can practice on my next colorwork project or stripy socks!
ReplyDeleteGreat post Aija! Thanks for the very helpful instructions and the even better pics. I wish I'd known this technique before I'd finished my last striped sweater!
ReplyDeleteThe afghan is looking gorgeous, by the way - you have me hunting high and low for cheap Kureyon now.
I tried it last night and all I can say is THANK YOU!!! Greatest knitting tip EVER!!! :)
ReplyDeleteWould this work with lace too, or is it best for something like stockinette? It looks awesome and I can't wait to try it.
ReplyDeleteFabulous! I do something similar, but this looks a lot neater to me.
ReplyDeleteI weave in my ends as I go in a similar way. And when I need to join a new strand of the same color, I alternate old ball with new ball every other stitch and do my weaving in thing at the same time. Two brids, one stone!
ReplyDeleteGood tutorial.
Thanks so much for posting this!! I'm definitely going to give it a try, I just hate weaving in ends. :)
ReplyDeleteAnd thank goodness you can use this for your lovely lizard ridge and avoid all that weaving at the end of the project.
That's it? It seems so obvious, but I never would have thought of it. Thanks so much for sharing the instructions!
ReplyDeleteYes, like others have said, thank you!! So glad you learned this as all those ends at the end would be very daunting!
ReplyDeleteWow... I followed that without even having to try it (since yeah, I'm at work and should be working... hehe). Fabulous post, thank you!
ReplyDeleteThanks for the new technique. Beats having to face all those ends to weave in!
ReplyDeleteThanks for sharing! I've been struggling with a striped shawl I've been knitting off and on. It changes color every 2 to 4 rows for a gazillion (at least it seams)rows. I was dreading having to weave all those ends in.
ReplyDeleteThat's cool!! Why didn't I think of that? Thanks for the turtorial.
ReplyDeleteI usually prefer to weave in my ends when I'm all done just in case I have to rip back. (It happens occasionally.) How easy is it to undo the woven-in ends if the need should arise?
ReplyDeleteAnd what if you have to change yarns on a wrong side, or purl, row? Does it work the same? (Yes, I could swatch and try, but ...)
ReplyDeleteYou're the coolest for sharing this!!!! Thank you SO much!
ReplyDeleteHi! Just wanted to let you know that this submission made it into this month's Yarnival! You can view the issue on my blog. Thanks for submitting! Have a GREAT DAY!
ReplyDeleteI'll have to try this out! Thanks for the info and all the photos.
ReplyDeleteI need help weaving in ends of a 2 ball scarf made in seed stitch. How do you do that when both signs are seen--that is, there are 2 right sides?
ReplyDeleteI just have to thank you for taking the time to post this tutorial. It's so understandable and well illustrated. You've saved me so much time on my current project.
ReplyDeleteIt's people like you who make the Internet so useful for knitters.
Oh my god, you have made my day! That is so incredibly awesome. I HATE weaving in ends, but I like doing stripes as well as other color work which have a lot of ends; even doing large projects creates a bunch of ends. You have saved me a lot of time, I plan to use this technique from now on! Thanks again.
ReplyDeleteYou rock! I just tried this and it works beautifully! I have always stayed away from knitting stripes because I HATE weaving in the ends. You are an angel! You have saved my life! Thank you for such a awesome tutorial.
ReplyDeleteFABULOUS! Great pics and instructions.
ReplyDeleteThank you
Debbie
This is GREAT! I'm starting the bmp socks today! BUT, I noticed the link from knitty to this tutorial isn't correct, just to let you know. Thanks, Sarahbee
ReplyDeleteGreat photos and explanation. Question: when I do this, I can see the color showing through on the front. Am I doing something wrong?
ReplyDeleteThis truly is the best. thing. ever. Thank you for the clear tutorial!! I've heard of this, but nobody has ever explained it in a comprehensible fashion before.
ReplyDeleteSo awesomely, amazingly helpful! Thank you and your teacher for sharing that!! Oh my goodness how I wish I had had this knowledge when i started my current project!
ReplyDeleteThank you!
thank you for sharing this technique, I can't wait to try it!
ReplyDeleteOh how wonderful !! I am 58, why couldn't I have learned this at 8 !!
ReplyDeleteThankyou
Indeed, a useful technique. I completed Judy Durcam's Sunrise Canyon jacket which involves color changes both in the background and the graphic and weaving in the myriad of ends saved my sanity. One note, it is possible to weave in ends on the wrong side of stockinette stitch. Just hold the old yarn in front, alternating above the needle, purl one, and then under the needle, purl the next stitch. It's not much different than doing it on the knit side. Try it!
ReplyDeleteAwesome!! Thank you for having the patience and time to do this.
ReplyDeleteHeyyyyy! I always heard of this, but couldn't picture it. Your pictures made it quite clear. I love color work, and now I'll love it more. Thanks!
ReplyDeleteKathyGab
This works great when adding a new skein on a solid color piece of work too - makes for a much neater finish!
ReplyDeleteThank you, thank you, thank you! I most avoid colorwork and seaming because I *hate* ends. Now, I can do something besides single color sweaters in the round! Thanks again!
ReplyDeleteThank you-I am blown away and can't wait to do this with all my projects I have hanging out on needles right now. I also did the Lizard ridge blanket in bright colors-but I love the grey colorway!
ReplyDeletei tried this but i'm not sure how to do it because i keep having both come through as the knit instead of just the one strand?! If i lay both ends over the needle (the old and the new) both would be worked through, no?
ReplyDeleteFirst ten stitches done with this technique (on my Modern Quilt Wrap). I feel like sending you chocolate in large quantities :o).
ReplyDeleteThis will save so much time (and teeth itching end weaving boredom)
Freakin.Genius!
ReplyDeleteI've linked to this tute. Your step by step was super helpful..I had tried to intuit this on my own but this made it crystal clear!!! Thank you so much for sharing and all the photos.
ReplyDeleteWell, as a Continental-style knitter, I decided to try this by doing almost everything the opposite of what you have shown. It seemed to work, so I've posted my discovery on my blog, the entry dated October 10, 2007.
ReplyDeleteThanks for showing this! It helped A LOT.
Thank you so much for these instructions. I just started a Lizard Ridge blanket, and I can't STAND carrying the yarn up the sides... either I don't do it right, or it's just ugly to begin with. This will help! :)
ReplyDeleteThis is very cool--I've always woven ends in Kaffe Fassett style, which results in the most hideous wrong side you can imagine. (Basically it's similar to this but much looser and spanning two or three stitches.) I want to dash home from work and start knitting to try this out.
ReplyDeleteThank you! This trick will help a lot. I hate weaving in ends.
ReplyDeleteThis is great! Thanks so much for this...I'm going to use it all the time! :)
ReplyDeleteThat is incredible! Hooray, no more weaving in ends!!
ReplyDeleteThis continues to be very helpful! I just shared it with my knitting group. And, thanks for sharing scrapdash's post about continental--I'm just learnign that method
ReplyDeleteThank you sooo much for taking the time to photograph and post this. It has helped a new gramma (and occasional knitter) start a fabulous striped sweater for her sweet baby girl. Much appreciated!
ReplyDeleteBrilliant! Thank you!
ReplyDeleteThanks for the great tutorial! A friend told me about this site and it is a life saver! Thanks again!!!!
ReplyDeleteHooray! This is AMAZING! And it makes so much sense! I can't wait to go try this out.
ReplyDeleteThank you so much for this excellent, clear tutorial. It is so good I was able to figure out how to use it for purl rows with no trouble at all. I have been using the technique in striped socks and the ends would have driven me mad - and not been as securely fastened in.
ReplyDeleteKeep up the good work -- it is a gift given only to a few to be able to explain things clearly
Your knitting is awesome! I only wish I could knit like that. Even though I have knitted for years I loose patience with myself.
ReplyDeleteI cannot tell you how awesome this is. I us it all the time because I can't seem to REMEMBER the steps. But seriously thanks. And your store is gorgous. I just bought some stitch markers!
ReplyDeleteThanks so much for sharing this, I've never really understood how to do this and I hate the darning needle too - plus the idea of knotting the yarn (erk) seemed so unprofessional. I'm going to try this technique on some moss stitch & see how it works out. Thanks again.
ReplyDeleteAwesome tutorial. My favorite part is the ultrasound photo in the background. :-) (Come to think of it, though, that baby is probably in kindergarten by now!)
ReplyDeleteThank you so very much for taking the time and trouble to make all these pics. I am a new knitter so I will have to practice this before actually trying it out on a project,but this is a very cool thing to know.
ReplyDeleteSharon
Thank you to you and JP for sharing this; I had heard you talk w/ Nicole and Jenny about it long ago, but always figured that I'd never understand.
ReplyDeleteYou two may have just changed my knitting life FOREVER...
That's awesome, Thanks!! I managed to figure out how to do it for purl stitches too, as I'm doing a rib. Bearing in mind I didn't know how to knit a rib a month ago, I could follow your (very clear) instructions. Thanks agin.
ReplyDeleteThis tutorial looks great, and I'll come back to it as soon as I'm ready to start my Modern Quilt Wrap. What I REALLY loved was the framed ultrasound in the background. What a miracle!
ReplyDeleteI juste used this technique on an entrelac piece I'm knitting...and man, could I just kiss you right now!
ReplyDeleteI'm actually excited to finish it now that I know I won't have to weave in 1,000 ends when I'm done! Hahaha
I am gonna make my self learn this. Thanks so much for this tutorial!!
ReplyDeleteIn the words of Montgomery Burns...
ReplyDeleteeeeeexcellent.
You have made my day! Excellent photos and instructions.
ReplyDeleteThank you for being so gracious, so thorough, and so willing to "pay it forward." You're a great example for all knitters.
ReplyDeleteThis is GREAT! If only I had found it BEFORE being on the last stretch of my striped scarf. Sadly, I did not know this before starting (it's only my second knitting project ever), and I have a ton of color ends hanging off one side. How would this work if using a pattern like k2p1 (that's what I'm doing for the scarf)?... Also, any tips on how to weave in the ends if you don't know this awesome method? I'm trying to find tips on how to weave in ends with a darn darning needle without having the yarn super obvious, but I can't find much! Your tutorial was so helpful, I'm hoping you can point me in the right direction!! Thanks~! please email kitty dot wilkin at gmail
ReplyDeleteThis is a fantastic post and I am very grateful for all the pictures. Two of my books tell me how to do this but the ambiguous instructions and lack of pictures have made this procedure into a head-banging puzzle. I was obviously winding the end in the wrong direction. That is hilarious because both books tell me to wind the yarn the same as would to knit it. (Things like that kind of make me so mad...)
ReplyDeleteAnyway, on a calmer note, THANK YOU AGAIN !
Thanks so much! This is something I've thought I could do but wasn't sure how. I will try it next time!
ReplyDeleteThank you, thank you, thank you - you have made my day :-)
ReplyDeleteAwesome instructions. I shared a link to them on my blog this week at http://lileesgram.blogspot.com/
ReplyDeleteThanks for sharing
I just came across this. This is great. Thanks for sharing. Has anyone worked out a way to do it on purl stitches? I would like to use it on ribbing.
ReplyDeleteThank you so much for this, I love it :-)
ReplyDeleteOmg, I luv u!
ReplyDeleteThis is fabulous - thank you so much!
ReplyDeleteThat is an amazing technique that not only looks great but saves time. Would you please make a video of this technique. Even with all the still photos I think a video would be beneficial.
ReplyDeleteThanks you!
Thanks for showing the details of this technique. It's exactly the way i change colours. I very rarely have ends to weave in. Brilliant!!
ReplyDeleteI having been knitting for 55 years and the ONE thing I disliked was working in the tails. NOW, after all these years I stumble across this ingenious FIX!! THANK YOU SOOOO much for teaching this old heifer a new trick.
ReplyDeleteNOW I find you! Aarrgghhhh...
ReplyDeleteThe afghan I'm finishing was originally a single color by designer but I had to make the different 'columns' in diff colors based on the recipient's colors relating to beach, sky, water.
Working with bobbins, the first row of switching colors took me 8 hours to knit! Thereafter, each of the 327+ rows took 30 minutes or so.
When crocheting, I work in the ends as I go along -- not thinking that this could be done when knitting.
Thank you!
Marny CA (not "Anonymous")
Oops ... forgot to ask why you use pron and porn ??
ReplyDeleteبرنامج محاسبة المخازن
ReplyDeleteشركات نقل عفش فى السعودية
ReplyDeleteبرنامج محاسبة شركات المقاولات
ReplyDeleteبابل للبرمجيات
ReplyDeletedewapoker88
bandarq
royalflush99
Jagoanpoker
dominoqq
poker online
markasbokep
royalflush88
idrbola88
cintabokep69
bokep indo
streaming bokep
Video xxx
bokep online
خرید vpn
ReplyDeleteخرید vpn
تعمیر تلویزیون در قم
سرور مجازی ترید
قیمت ترموکوپل
کلید سازی شبانه روزی و سیار
خرید سرور مجازی
خدمات سئو